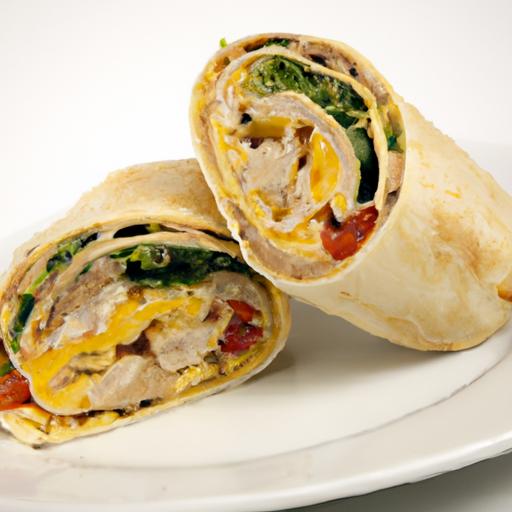
There’s something irresistibly comforting about a classic tuna melt-teh warm, gooey cheese mingling perfectly wiht savory tuna, embraced by crisp, toasted bread.But what if we reimagined this beloved favorite in a way that’s lighter, more portable, and just as satisfying? Enter the Tuna Melt Wrap: a delicious twist that combines the hearty flavors of the traditional sandwich with the convenience and freshness of a wrap. In this article, we’ll explore how this innovative take not only preserves the essence of the classic but also adds a new layer of versatility to your lunch repertoire-making mealtime both exciting and effortlessly tasty.
Crafting the Perfect Tuna Melt Wrap Filling with Fresh ingredients
Tuna melt wrap enthusiasts will appreciate the harmony of fresh, vibrant ingredients that transform this classic sandwich into a handheld delight. The secret lies in balancing creamy textures with zesty brightness, creating a filling that’s nothing short of irresistible. Starting with high-quality canned tuna packed in water or olive oil, combined with crisp celery, tangy pickles, and a dash of Dijon mustard, this filling bursts with flavor and texture. Freshly chopped herbs like dill or parsley elevate the taste, while a touch of lemon juice brightens every bite, making your tuna melt wrap shine.
Choosing the Ideal Bread and Cheese for Ultimate flavor and Texture
Picking the right base is crucial. A soft, pliable tortilla or large flour wrap works wonders for rolling, but artisan spinach or sun-dried tomato wraps add visual appeal and extra flavor notes. When it comes to the cheese, creamy and melty options like sharp cheddar, smoky Gruyère, or classic Swiss cheeses provide the perfect luscious layer. The cheese not only binds the filling but offers that essential gooey texture that defines a stellar tuna melt wrap experience.
Step by Step Guide to Wrapping and Grilling Your Tuna Melt Wrap
- Lay your wrap flat on a clean surface. Spread an even layer of prepared tuna melt filling, leaving about 1.5 inches of space around the edges.
- Add slices of cheese on top of the filling. Ensure they cover the tuna evenly to guarantee perfect melt.
- Fold the sides inward, then roll from one end firmly but gently, preventing leakage during grilling.
- Preheat a non-stick skillet or panini press over medium heat. Lightly butter or spray the outside of the wrap for golden crispness.
- Grill the wrap for 3-4 minutes each side until the wrap is crisp and the cheese is irresistibly melted. Use a spatula to press slightly for even grilling.
- Remove and let rest for a minute before slicing to preserve the molten cheese inside.
Creative Serving Ideas and Side Dishes to Complement Your Tuna Melt Wrap
Pair your tuna melt wrap with a side that enhances its rich, creamy texture without overwhelming it. A crisp mixed greens salad tossed in lemon vinaigrette adds refreshing contrast. For crunch lovers, baked sweet potato fries or lightly seasoned kettle chips offer satisfying texture. Elevate presentation with colorful garnishes like chopped chives, a sprinkle of smoked paprika, or a few dill sprigs. For an adventurous twist, serve alongside a tangy cucumber-yogurt dip or a shining mango salsa to awaken your palate.
Prep and Cook Time
- Prep Time: 15 minutes
- Cook Time: 10 minutes
- Total Time: 25 minutes
Yield
Serves 2 hearty portions
difficulty Level
Easy
Ingredients
- 1 can (5 oz) tuna, drained and flaked
- 2 large flour tortillas or spinach wraps
- ½ cup celery, finely chopped
- 2 tbsp dill pickles, finely diced
- 2 tbsp mayonnaise (preferably light or homemade)
- 1 tsp Dijon mustard
- 1 tbsp fresh lemon juice
- 1 tbsp fresh parsley, chopped
- 4 slices sharp cheddar cheese or Gruyère
- butter or olive oil for grilling
- Salt and freshly ground black pepper to taste
Instructions
- Prepare the tuna filling: In a medium bowl, mix the flaked tuna, mayonnaise, Dijon mustard, lemon juice, celery, pickles, and parsley. Season with salt and pepper. stir gently until well combined but not mushy.
- Assemble the wrap: Place one tortilla flat on a clean surface. Spread half of the tuna mixture evenly across the center, leaving edges free to fold.
- Add cheese slices: Layer two slices of cheese evenly over the tuna filling. Repeat assembly for second wrap.
- Roll tightly: Fold the sides of the tortilla inward and roll from one end, ensuring the filling is sealed inside. Repeat for the other wrap.
- Heat your skillet: Warm a non-stick skillet or panini press over medium heat. lightly brush the outside of the wraps with butter or oil for a golden crust.
- Grill the wraps: Place wraps in the pan and grill 3-4 minutes per side or until tortilla is crisp and cheese has melted. Press gently with a spatula for even browning.
- Rest and slice: Remove from heat, let rest a minute, then slice diagonally and serve.
Chef’s Notes
- For a lighter option, swap mayonnaise for Greek yogurt or avocado mash for creaminess.
- Try smoked mozzarella or provolone cheese for a different melt profile and flavor.
- To add a crunch, toss in some finely chopped red onion or bell pepper into the tuna mix.
- Make ahead: The tuna filling can be prepared up to 24 hours in advance and stored refrigerated.
- If wraps are getting soggy, grill them just before serving to retain crispness.
Serving Suggestions
Serve your tuna melt wrap with a fresh side of kale chips for a nourishing crunch or alongside a bright tomato and basil salad drizzled with balsamic glaze.Garnish with a wedge of lemon and a sprinkle of fresh parsley to lift the flavors visually and gastronomically. For extra indulgence, offer a small ramekin of spicy aioli or honey mustard for dipping.
| Nutritional info | Per Serving |
|---|---|
| Calories | 420 kcal |
| Protein | 36g |
| Carbohydrates | 28g |
| Fat | 18g |

For more creative sandwich ideas, explore our Creative Sandwich Ideas Collection. To learn about the nutritional benefits of tuna, check out FDA’s guide on seafood safety.
Q&A
Q&A: Tuna Melt Wrap – A Delicious Twist on a Classic Favorite
Q1: What exactly is a Tuna Melt Wrap?
A1: Think of your beloved tuna melt-gooey cheese, savory tuna salad, and that satisfying toasty crunch-but instead of bread, it’s all lovingly wrapped in a soft, warm tortilla. It’s a handheld, convenient, and slightly lighter spin on the classic tuna melt sandwich.
Q2: How does the Tuna Melt Wrap differ from a traditional tuna melt?
A2: The main difference lies in the wrap. Traditional tuna melts use sliced bread, often grilled or toasted, while the Tuna Melt Wrap swaps the bread for a pliable tortilla or flatbread. This change makes it easier to eat on the go and adds a subtle, chewy texture that complements the creamy filling beautifully.
Q3: What makes the Tuna Melt Wrap so delicious?
A3: It’s all about the balance of flavors and textures! The tangy, savory tuna salad pairs perfectly with melted cheese-usually cheddar or Swiss-creating a luscious, melty center. The wrap adds a mild, tender base that holds everything together without overshadowing the fillings. Plus, toasting the wrap seals in warmth and gives a slight crispness that’s downright addictive.
Q4: Can the Tuna Melt Wrap be customized?
A4: absolutely! One of the best parts about this dish is its versatility.Swap classic cheddar for pepper jack for a spicy kick, add sliced avocado for creaminess, or toss in some fresh spinach or tomato slices to brighten things up. Feel free to experiment with your favorite seasonings or add a dash of hot sauce for extra zest.
Q5: Is the Tuna Melt Wrap a healthy option?
A5: It can be! Tuna is a lean source of protein packed with omega-3s,and using a whole wheat or spinach tortilla boosts fiber content. To keep it lighter, use a moderate amount of cheese and a homemade tuna salad made with Greek yogurt or avocado instead of heavy mayo. It’s a delicious way to enjoy a classic comfort food with a nutritious twist.Q6: How do you make a Tuna Melt Wrap at home?
A6: Begin with your favorite tuna salad, spread it evenly over a tortilla, layer on slices of cheese, and add any extras you like. Fold the wrap snugly and toast it in a skillet or sandwich press until the cheese melts and the wrap turns golden.Voila-a quick, satisfying meal that reinvents the traditional tuna melt with flair.Q7: Where did the idea of the Tuna Melt Wrap come from?
A7: The Tuna Melt Wrap emerged as a natural evolution of the classic tuna melt, influenced by the growing popularity of wraps as quick, portable meals. It’s a creative fusion that maintains the soul of the original while embracing modern eating habits and flavor exploration.
Q8: What occasions are perfect for serving Tuna Melt Wraps?
A8: Tuna Melt Wraps shine as lunchbox heroes, picnic treats, or casual dinner options. Their portability makes them ideal for on-the-go meals, office lunches, or even a relaxed weekend brunch. Plus, they’re crowd-pleasers-easy to customize and satisfying for all taste buds.
Ready to wrap your cravings in cheesy, tuna-packed goodness? The Tuna Melt Wrap invites you to rediscover a timeless classic with a fresh, flavorful twist!
Insights and Conclusions
Whether you’re craving a quick lunch or a comforting snack, the Tuna Melt Wrap offers a delightful twist on the timeless tuna melt sandwich. Its portability, melty cheese, and fresh ingredients come together to create a harmony of flavors that’s as convenient as it is satisfying. So next time you want to reinvent a classic favorite, unwrap this delicious idea and enjoy a meal that’s both familiar and refreshingly new. Your taste buds-and your schedule-will thank you.